Learn how to create custom brushes in Adobe Illustrator with this step-by-step guide. Discover techniques to design unique brushes, improve workflow, and enhance your vector artwork.
Custom brushes are one of the most powerful yet underutilized features in Adobe Illustrator. Whether you’re creating hand-drawn typography, decorative elements, or intricate illustrations, custom brushes allow you to add personality and efficiency to your workflow.
Instead of repeating the same strokes manually, you can design once and reuse endlessly—saving time while maintaining consistency across your projects.
In this guide, you’ll learn how to create, edit, and optimize custom brushes like a professional designer.
Why Use Custom Brushes in Illustrator?
Before diving into the steps, here’s why custom brushes matter:
- Speed up repetitive design tasks
- Create a unique visual style
- Improve consistency across projects
- Simulate hand-drawn or textured effects
- Enhance typography and illustration work
For font designers and illustrators, custom brushes can even become part of your signature style.
Types of Brushes in Adobe Illustrator
Understanding brush types is essential before creating your own:
- Calligraphic Brush – Mimics pen or brush strokes
- Scatter Brush – Scatters objects along a path
- Art Brush – Stretches artwork along a path
- Pattern Brush – Repeats a pattern along a path
- Bristle Brush – Simulates natural painting
Each type serves a different purpose, and choosing the right one will affect your final result.
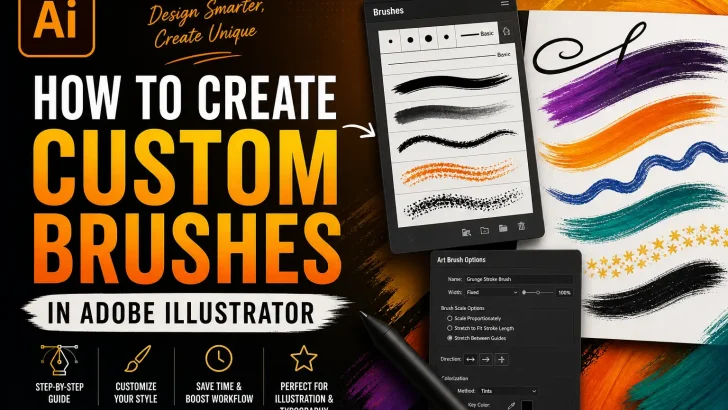
Step-by-Step: Creating a Custom Brush
Step 1: Create Your Base Artwork
Start by drawing the shape or element you want to turn into a brush.
Tips:
- Keep it simple and clean
- Use vector shapes (avoid raster images)
- Expand strokes if necessary (Object → Expand)
Step 2: Open the Brushes Panel
Go to:
Window → Brushes
This panel is where all your brushes will be stored and managed.
Step 3: Create a New Brush
- Click the New Brush (+ icon)
- Choose the brush type:
- Use Art Brush for strokes
- Use Pattern Brush for borders
- Use Scatter Brush for decorative effects
Step 4: Adjust Brush Settings
Depending on the brush type, customize:
- Direction – Controls flow along the path
- Scale – Determines size behavior
- Spacing – Important for pattern/scatter brushes
- Colorization Method:
- Tints (recommended for flexible color changes)
Pro Tip: Use “Tints” so your brush adapts to stroke color dynamically.
Step 5: Apply Your Brush
Select any path and click your custom brush.
Now your simple line transforms into a styled stroke instantly.
Advanced Techniques for Better Brushes
1. Create Texture Brushes
Use rough edges or grain effects to simulate hand-drawn textures.
2. Combine Multiple Shapes
Group elements before turning them into a brush for more complex designs.
3. Use Pressure Sensitivity (Tablet Users)
If you’re using a drawing tablet, enable pressure settings for more natural strokes.
4. Expand Appearance for Final Edits
Go to:
Object → Expand Appearance
This converts brush strokes into editable vector shapes.
Common Mistakes to Avoid
- Using overly complex shapes (can slow performance)
- Ignoring scaling settings
- Not testing brushes on different stroke sizes
- Forgetting to save brushes in a library
How to Save and Reuse Your Brushes
To avoid recreating brushes every time:
- Open Brushes Panel
- Click menu → Save Brush Library
- Store it for future projects
You can even build your own premium brush collection to sell or bundle with your design assets.
Practical Use Cases
Custom brushes are perfect for:
- Hand-lettering & typography
- Logo accents and decorative lines
- Illustration detailing
- Border and frame design
- Vintage or retro effects
If you’re designing fonts or branding assets, brushes can significantly enhance your creative output.
Conclusion
Mastering custom brushes in Adobe Illustrator opens up a new level of creativity and efficiency. Instead of relying on default tools, you can build a personalized toolkit that reflects your unique design style.
The more you experiment, the more versatile your brushes become—turning simple strokes into powerful visual elements.
Looking to elevate your design workflow even further?
Browse premium fonts and design assets to pair perfectly with your custom brush creations and build a distinctive visual identity.